Saturday, November 17, 2012

SQLite database on Android platform


Android provides nice way of storing data into database and this is possible with its internal library SQLite. SQLite is a very light weight database and its included into android's library stack.
See android architecture here for more details.

     + 

SQLite is opensource database, to learn more about the SQLite refer here.

This example demonstrate how SQLite can be used in Android application.
I have used few basic example of create database and table, insert record, select record from table and delete table.

This blog also explains the example for the android basic widgets which includes TextView and buttons. If user wants they can use other external tool for the development of gui ( for eg. droiddraw , etc), i have have done most of the gui development by modifying the xml directly or with the default gui builder.

Create Database


Create Table


Insert record into table


Query SQLite table


Delete table and close database connection


This is a simple android which which shows a thought of the day to a user, if user wants to see more thoughts than user can press next else user can press thanks button. Purpose of this post is just to show the capability of SQLite, so there are only 20 records available in the table and they are shown in some random number.


You can either checkout or download this sample application code from here.

Monday, August 6, 2012

GWT Editable Table - CellTable with remove row


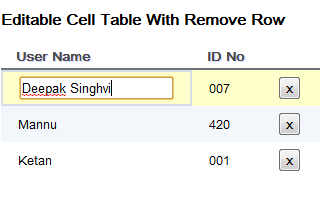
GWT offers table where we can specify column types, and make rows data modifiable.

CellTable supports paging and columns, i have not used paging in this example but only specified the columns for text and button.


The Column class defines the Cell used to render a column.

Implement Column.getValue(Object) to retrieve the field value from the row object that will be rendered in the Cell.


and the data which will be rendered:

You can use TextCell instead of EditTextCell, in case you do not want to make column editable.


DataProvider, ListDataProvider can display data which should be provided as list.

I have used modal User to create few items in the list and provide the same to the ListDataProvider and which works as the modal for the celltable.


Remove row from the dataProvider and table.


When user clicks on "x" update gets called from updater and where we can remove the row from the modal and refresh modal and re-draw table (i found without refresh modal and redraw table call also it was working fine).

Example files are available to download <<==== click here to download.
Look for GwtExamples.rar (v.1) 

Tuesday, July 24, 2012

GWT RPC - Server communication with MongoDB

Further to the client tutorial in the previous blog, here i am going to present how client communicates with the server with the help of GWT RPC (Remote Procedure Call).
Using RPC which works asynchronously only specific part of the client components can be updated without updating the complete client.


Pre-Requisite:
Java, Eclipse with GWT plugin, MongoDB.


In this example i have extended the previous client to
  a) save data i.e. user data to database and
  b) authentication user

Client can send/receive serializable objects to/from the server. In this example server is going to use that data and insert in into DB, which is MongoDB in our case.


Create Modal
As the client can send serializable java objects over HTTP. Lets create a modal first.


User.java


Create Service
Now we need to have a service which a client can use.
In our case we name it as MongoDBService and it implements RemoteService


MongoDBService.java


@RemoteServiceRelativePath("dbservice") is annotation used for the service identification and calling, which should match with the service path defined in web.xml for servlet-mapping tag.

We need to create Asynchronous service for our MongoDBService, client is actually going to call RPC through MongoDBServiceAsync. All methods of MongoDBService will have extra parameter which is of type AsyncCallback. Client call will be notified when any asynchronous service call completes.

MongoDBServiceAsync.java


Implement service at the server side
Create class MongoDBServiceImpl which extends RemoteServiceServlet and implements MongoDBService. Basically MongoDBServiceImpl is a servlet which is extending from RemoteServiceServlet rather than the HttpServlet directly.


Updating web.xml with servlet details
make sure that all the service which are created with the annotation RemoteServiceRelativePath are added properly for each servlet.

web.xml


url pattern tag path should be formed using module/service.
In this case module name is gwtwebappdemo ( see in GwtWebAppDemo.gwt.xml for rename-to value) and service in dbservice.


Client Service Call
calling service from client


Running application

1) Start MongoDB
    In this case i have started DB without authentication and on default port.
    Default port is 27017 which we have used to connect to database in the code. See DBUtil.java in the
   example.


2) Add user into database.
    Client calls asynchronous call to server, server starts the processing. Once request processing is finished it calls back with the call back handler provided in the request. Client gets call in onFailure in case of failure and onSuccess in case of request processing successful.


    In the server side, server received the User object and sets the data into User collection which is in the mymongodb database using BasicDBObject.

MongoDBServiceImpl.java


3) Check the collection ( table) creation in dbs (database)
    In this example mymongodb is the database and User is the collection which we are using.
    Initially both database and collection is not present, when the first save happens. Both gets automatically
    created.


4) Check User Authentication with wrong input.


Download complete example from here in GwtWebAppDemo_server.rar file.

Tuesday, July 17, 2012

Google Web Toolkit - step by step GWT client tutorial

Its free!
Its opensource!
Its makes development faster!
Its amazing!
Faster development of web application with an ease.
AJAX based app develop in java and run in all browser.
Works well with Android/iPhone.

Google has done preaching on their site and blog about GWT, find more details their.
Ofcourse believers of those preaching also wrote a lot about it on their blog(s), website(s), papers, etc,
So, moving to example.:

Pre-requisetes
   Eclipse, Java.


Download and install GWT plugin for eclipse, in my case its for indigo and link is as follows:
http://dl.google.com/eclipse/plugin/3.7

for complete instruction use the following link
https://developers.google.com/eclipse/docs/install-eclipse-3.7


Create a Google Web Project -> GwtWebAppDemo

     Click on next.

    Un-check the checkbox "Use Google App Engine" as we are going to use internal app server.
    Click on finish.
    A new google web project is created with default project files.
 
    Delete all default java files from client, server and shared package.
    Add a new Entry-Point class into the client package.


One entry will be added into GwtWebAppDemo.gwt.xml.
Verify that entry point is correct in GwtWebAppDemo.gwt.xml. In this case its


Change the class in entry-point tag if you have changed/added the class manually and not as Entry Point Class.


Add RootPanel to the entry point class i.e. GwtDemoAppClient.java in onModuleLoad() method.


RootPanel rootPanel = RootPanel.get();

RootPanle is a panel to which all other widgets must ultimately be added.
RootPanels are never created directly. Rather, they are accessed via get().
Most applications will add widgets to the default root panel in their EntryPoint.onModuleLoad() methods.


After that right client on GwtDemoAppClient.java and open with GWT Designer
We are ready for adding the components by drag and drop.


I have selected LayoutPanel as it allows its children to be positioned using arbitrary constraints.


After adding the components you can see the generated code:


Add few componets to the layoutPanel and test the demo without web app to see it as preview.


If its fine than go ahead and create a web app/deploy to internal app server which is jetty.
Else go and add/remove/update components in the panel.

Change the default html content of GwtWebAppDemo.html in the war/WEB-INF folder.


Right click on the project and click on Run As Web Application
It will start new tab as development mode, copy the link and paste into your browser


For the first time it will ask for installing the plugin for gwt. 
Install it and see the application running.


Do remember to close the client running the the IDE before launching it again.


You can download sample from here  --> GwtWebAppDemo.rar 

Wednesday, March 28, 2012

Power of Script writing in the world of JavaScript.

When i was intern, i got a change to choose the technology on which i could develop a tool. PHP or Java. I choose Java, why.... hmmm... its easy to learn, use, understand, scalable (a myth), etc, etc, etc.
Later understood facebook uses php a lot.

Browsed few perl scripts few years back and did not even like it.
Later understood perl developed is easiest in many ways and faster. Faster in execution too.

JavaScript........ahhhh, what is this, i did not like it. Some kind of client side work, which looks like always messy. :-(
Later understood that its not only the client side script any more.

So suddenly my thinking about the script writing, understanding, acceptance has changed. Script programming is amazing.

First got to know about MONGODB. Oh its amazing, it understands java script. We can do all crud
operations with java script syntax. Its a document oriented storage with "NOSQL".

Than checked which mapper can be used and found node.js -> mongoose.


 And tried some hands on with node.js + mongodb + express + mongoose + jade (a template engine). Jade for view, remaining things for model and controller.

 And commonality in all these things are java script is everywhere. Commonality, an important factor for a software product with quality. Of-course there are many point and which i do not want to touch now.
So the point is: 
Server side java script. 
Client side java script. 
Database operations in java script. 
Oh, its heaven --> IT IS THE WORLD OF JAVA SCRIPT.

I am going to take you through some steps which can be useful to start with server side java script. You can download the project from my git repository at


 https://github.com/deepaksinghvi/nodejssample

1) Download Install node from http://nodejs.org/. This installs node and npm ( node package manager).
    npm is used to install all the dependent modules, like mongoose, express, jade, stylus, etc.
2) Next install all the dependent modules:
    cmd prompt> npm install mongoose express jade stylus
      or you can do one by one also.
3) Now lets write few java script files
     a) load all the required libraries which we have just installed and create an application server.


     b) create model and controller scripts.

         Creating a model (models/model.js).
The controller part normally known in the node.js development worlds as routing, i have kept in the main script file only ( which is app.js).
Routing of creation of a new user. This creates a new user and saved it into the database.

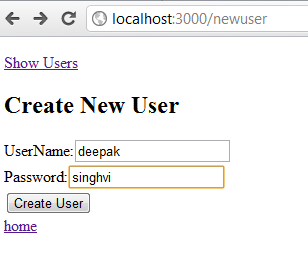
User clicks on "Create User" button and it request gets routed to above mentioned script.

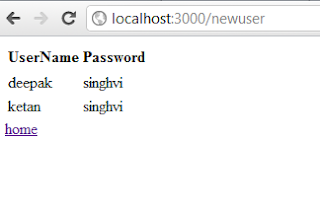
Once user gets added than listing of users shown from the table ( known as collection in the world of mongodb) or it can be shown if user clicks on "Show Users" link in the above image.


4) Enjoy the sample application.
    To start the application:
    a) Start database
         mongodb/bin>mongod --dbpath /data/db 
       
    b) Start sample application
         nodejssample> node app.js


I tried to provide a very simple sample to start with node.js and mongodb. Its a perfect match for a rapid web based development. 
WebSocket also looks very promising, a lot has been written about it. I would like to try some of the exercise on that and will be sharing that as well in the next blog (hopefully).


Heroku Custom Trust Store for SSL Handshake

  Working with Heroku for deploying apps (java, nodejs, etc..) is made very easy but while integrating one of the service ho...