Further to the client tutorial in the previous blog, here i am going to present how client communicates with the server with the help of GWT RPC (Remote Procedure Call).
Using RPC which works asynchronously only specific part of the client components can be updated without updating the complete client.
Pre-Requisite:
Java, Eclipse with GWT plugin, MongoDB.
In this example i have extended the previous client to
a) save data i.e. user data to database and
b) authentication user
Client can send/receive serializable objects to/from the server. In this example server is going to use that data and insert in into DB, which is MongoDB in our case.
Create Modal
As the client can send serializable java objects over HTTP. Lets create a modal first.
User.java
Create Service
Now we need to have a service which a client can use.
In our case we name it as MongoDBService and it implements RemoteService
MongoDBService.java
@RemoteServiceRelativePath("dbservice") is annotation used for the service identification and calling, which should match with the service path defined in web.xml for servlet-mapping tag.
We need to create Asynchronous service for our MongoDBService, client is actually going to call RPC through MongoDBServiceAsync. All methods of MongoDBService will have extra parameter which is of type AsyncCallback. Client call will be notified when any asynchronous service call completes.
MongoDBServiceAsync.java
Implement service at the server side
Create class MongoDBServiceImpl which extends RemoteServiceServlet and implements MongoDBService. Basically MongoDBServiceImpl is a servlet which is extending from RemoteServiceServlet rather than the HttpServlet directly.
Updating web.xml with servlet details
make sure that all the service which are created with the annotation RemoteServiceRelativePath are added properly for each servlet.
web.xml
url pattern tag path should be formed using module/service.
In this case module name is gwtwebappdemo ( see in GwtWebAppDemo.gwt.xml for rename-to value) and service in dbservice.
Client Service Call
calling service from client
Running application
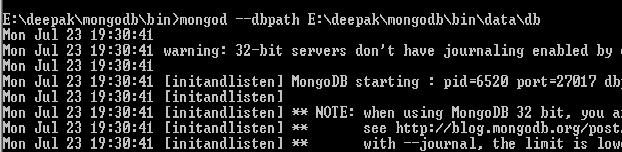
1) Start MongoDB
In this case i have started DB without authentication and on default port.
Default port is 27017 which we have used to connect to database in the code. See DBUtil.java in the
example.
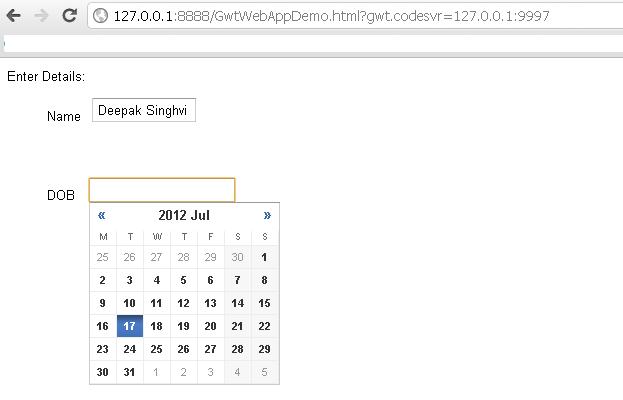
2) Add user into database.
Client calls asynchronous call to server, server starts the processing. Once request processing is finished it calls back with the call back handler provided in the request. Client gets call in onFailure in case of failure and onSuccess in case of request processing successful.

In the server side, server received the User object and sets the data into User collection which is in the mymongodb database using BasicDBObject.
MongoDBServiceImpl.java
3) Check the collection ( table) creation in dbs (database)
In this example mymongodb is the database and User is the collection which we are using.
Initially both database and collection is not present, when the first save happens. Both gets automatically
created.

4) Check User Authentication with wrong input.

Using RPC which works asynchronously only specific part of the client components can be updated without updating the complete client.

Pre-Requisite:
Java, Eclipse with GWT plugin, MongoDB.
In this example i have extended the previous client to
a) save data i.e. user data to database and
b) authentication user
Client can send/receive serializable objects to/from the server. In this example server is going to use that data and insert in into DB, which is MongoDB in our case.
Create Modal
As the client can send serializable java objects over HTTP. Lets create a modal first.
User.java
Create Service
Now we need to have a service which a client can use.
In our case we name it as MongoDBService and it implements RemoteService
MongoDBService.java
@RemoteServiceRelativePath("dbservice") is annotation used for the service identification and calling, which should match with the service path defined in web.xml for servlet-mapping tag.
We need to create Asynchronous service for our MongoDBService, client is actually going to call RPC through MongoDBServiceAsync. All methods of MongoDBService will have extra parameter which is of type AsyncCallback. Client call will be notified when any asynchronous service call completes.
MongoDBServiceAsync.java
Implement service at the server side
Create class MongoDBServiceImpl which extends RemoteServiceServlet and implements MongoDBService. Basically MongoDBServiceImpl is a servlet which is extending from RemoteServiceServlet rather than the HttpServlet directly.
Updating web.xml with servlet details
make sure that all the service which are created with the annotation RemoteServiceRelativePath are added properly for each servlet.
web.xml
url pattern tag path should be formed using module/service.
In this case module name is gwtwebappdemo ( see in GwtWebAppDemo.gwt.xml for rename-to value) and service in dbservice.
Client Service Call
calling service from client
Running application
1) Start MongoDB
In this case i have started DB without authentication and on default port.
Default port is 27017 which we have used to connect to database in the code. See DBUtil.java in the
example.

2) Add user into database.
Client calls asynchronous call to server, server starts the processing. Once request processing is finished it calls back with the call back handler provided in the request. Client gets call in onFailure in case of failure and onSuccess in case of request processing successful.

In the server side, server received the User object and sets the data into User collection which is in the mymongodb database using BasicDBObject.
MongoDBServiceImpl.java
3) Check the collection ( table) creation in dbs (database)
In this example mymongodb is the database and User is the collection which we are using.
Initially both database and collection is not present, when the first save happens. Both gets automatically
created.

4) Check User Authentication with wrong input.


