Multitenancy and the problem of managing the data
Multitenancy refers to a principle in software architecture where a single instance of the software runs on a server, serving multiple client organizations (tenants). Multitenancy is contrasted with a multi-instance architecture where separate software instances (or hardware systems) are set up for different client organizations. With a multitenant architecture, a software application is designed to virtually partition its data and configuration, and each client organization works with a customized virtual application instance. [WIKI]
What if i want to migrate my existing system to any cloud engine?
Move all of code/business logic to app engine, perfect, no problem, but what if my database is already on another physical infrastructure(and which is shredded,etc)?
Of-course app engine/GAE gives you the ability to scale, security, high availability, etc. but with their own terms.You need to use the database which is supported only by the app engine.
Which is one of the major drawback for the GAE and similarly other cloud engines.
I wanted to use MongoDB with Google App Engine(GAE) and could not see the possibility because we can't run MongoDB on GAE and supposed to use Google datastore.
There are few more issues as GAE's highly restricted sandbox. As GAE's docs says your application can only access other computers on the internet through the provided URL fetch and email services (and fewer more ways). Other computers can only connect to the application by making HTTP/HTTPS requests on the standard port. If you want to open a socket from your business logic, its not allowed and GAE will raise an exception.
Few good things happened in this direction, when google annoucned back in 2011 about Google Cloud SQL webservice to support MySQL - https://developers.google.com/cloud-sql/
Some of the other cloud engines have provided more options such as Amazon RDS supports MySQL, Oracle or Microsoft SQL Server database engine. This means that the code, applications, and tools you already use today with your existing databases can be used with Amazon RDS.
I was adamant to move from MongoDB and to use my application with the GAE and mongolab became the savior. Why i want to use my own choice of database because i have already have my own hosted database servers because i want to manage data on my own (security reason, business reason, etc)
Here is the steps how can we use GAE with MongoDB, when your MongoDB instance is hosted on DB cloud.
1) Signup, login and create a database on mongolab

2) Create a collection
Creation of collection (table) can be done by going to database and click on "Add".
3) Open collection which is currently empty and open the API view.
Connection information on the top of the "Collections" tab is the url which we are going to use interact
with "mongodb" database created in step1, mongolab has provided REST based methods for database
interactions.

At this point we are done with our database part.
Lets move to GWT(Google Web Toolkit) to create a project.
Multitenancy refers to a principle in software architecture where a single instance of the software runs on a server, serving multiple client organizations (tenants). Multitenancy is contrasted with a multi-instance architecture where separate software instances (or hardware systems) are set up for different client organizations. With a multitenant architecture, a software application is designed to virtually partition its data and configuration, and each client organization works with a customized virtual application instance. [WIKI]
What if i want to migrate my existing system to any cloud engine?
Move all of code/business logic to app engine, perfect, no problem, but what if my database is already on another physical infrastructure(and which is shredded,etc)?
Of-course app engine/GAE gives you the ability to scale, security, high availability, etc. but with their own terms.You need to use the database which is supported only by the app engine.
Which is one of the major drawback for the GAE and similarly other cloud engines.
I wanted to use MongoDB with Google App Engine(GAE) and could not see the possibility because we can't run MongoDB on GAE and supposed to use Google datastore.
There are few more issues as GAE's highly restricted sandbox. As GAE's docs says your application can only access other computers on the internet through the provided URL fetch and email services (and fewer more ways). Other computers can only connect to the application by making HTTP/HTTPS requests on the standard port. If you want to open a socket from your business logic, its not allowed and GAE will raise an exception.
Few good things happened in this direction, when google annoucned back in 2011 about Google Cloud SQL webservice to support MySQL - https://developers.google.com/cloud-sql/
Some of the other cloud engines have provided more options such as Amazon RDS supports MySQL, Oracle or Microsoft SQL Server database engine. This means that the code, applications, and tools you already use today with your existing databases can be used with Amazon RDS.
I was adamant to move from MongoDB and to use my application with the GAE and mongolab became the savior. Why i want to use my own choice of database because i have already have my own hosted database servers because i want to manage data on my own (security reason, business reason, etc)
Here is the steps how can we use GAE with MongoDB, when your MongoDB instance is hosted on DB cloud.
1) Signup, login and create a database on mongolab

This is going to create mongodb as the database.
2) Create a collection
Creation of collection (table) can be done by going to database and click on "Add".
3) Open collection which is currently empty and open the API view.
Connection information on the top of the "Collections" tab is the url which we are going to use interact
with "mongodb" database created in step1, mongolab has provided REST based methods for database
interactions.

At this point we are done with our database part.
Lets move to GWT(Google Web Toolkit) to create a project.
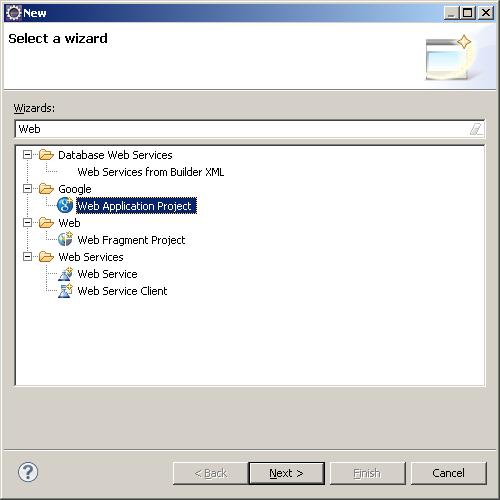
4) Create a Web Application Project and make sure that "Use Google App Engine" is checked.

Create a GWT based application, i have used the almost same application which i have created earlier,
you can refer the steps for the application creation here GWT RPC - Server communication with
MongoDB
The only change here is that the mongodb is hosted on some cloud, and because of that implementation
for is going to change.
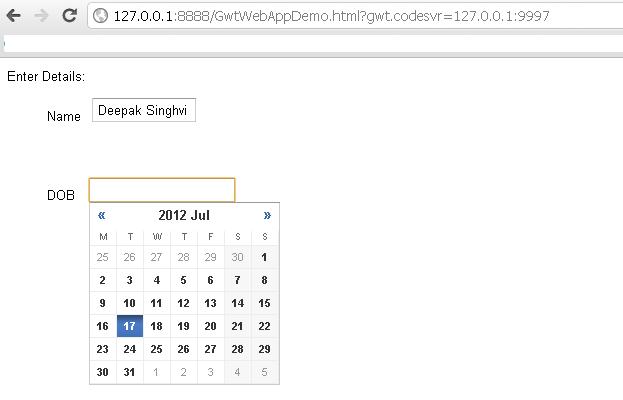
5) Insert a recod and retrive records from cloud database.
Inserting a record into the databased using the apache's HTTPClient to connect to mongodb hosted on
cloud, which interacts with the REST based webservice.
Get all available users from the database.
As i mentioned earlier about the sandbox security of GAE, i could not use HttpClient directly to invoke
webserivce and get the data, and had to tweak it bit to make it happen. Shortly going to update about the
problem as well in this post, which will be describing about GAEConnectionManager.
6) In order to deploy the developed application on cloud, create an an application identifier on app engine.
After creation you can see the application as follows:

Update in/war/WEB-INF/appengine-web.xml and place it under "application" tag.
7) Login to google account from eclipse(you can find it in the bottom left) and deploy the app on the app
engine.

And we are done!, app is available and hosted.
You can access it from here: http://mongocloudapp.appspot.com/
 I would like to say that overall it is a very nice experience with the app development with GAE and
without loosing the my own preferred database.

Create a GWT based application, i have used the almost same application which i have created earlier,
you can refer the steps for the application creation here GWT RPC - Server communication with
MongoDB
The only change here is that the mongodb is hosted on some cloud, and because of that implementation
for is going to change.
5) Insert a recod and retrive records from cloud database.
Inserting a record into the databased using the apache's HTTPClient to connect to mongodb hosted on
cloud, which interacts with the REST based webservice.
Get all available users from the database.
As i mentioned earlier about the sandbox security of GAE, i could not use HttpClient directly to invoke
webserivce and get the data, and had to tweak it bit to make it happen. Shortly going to update about the
problem as well in this post, which will be describing about GAEConnectionManager.
6) In order to deploy the developed application on cloud, create an an application identifier on app engine.
After creation you can see the application as follows:

Update in
7) Login to google account from eclipse(you can find it in the bottom left) and deploy the app on the app
engine.
And we are done!, app is available and hosted.
You can access it from here: http://mongocloudapp.appspot.com/

without loosing the my own preferred database.


